CentOS Stream 8
– |
プラン |
仮想CPU |
仮想メモリ容量 |
仮想ディスク容量 |
|---|---|---|---|---|
スケールアップ前 |
SSD 4G |
4CPU |
4096MB |
200GiB |
スケールアップ後 |
SSD 8G |
6CPU |
8192MB |
400GiB |
スケールアップを実施する
ヒント
スケールアップ実施の前に、重要なデータのバックアップ取得をお勧めいたします。
ディスク拡張の準備作業
サーバーの起動とログイン
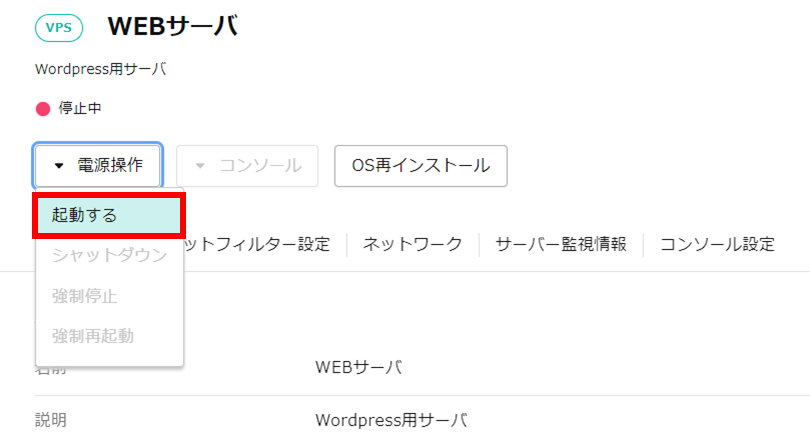
スケールアップ完了後、VPSコントロールパネルの「電源操作」から「起動する」を押して仮想サーバーを起動します。
VNCコンソールまたはSSH経由で仮想サーバーへログインし、rootユーザーに切り替えます。
ディスクを拡張する
ディスクの状態を確認
現在のディスクの状況を確認します。
# gdisk -l /dev/vda
GPT fdisk (gdisk) version 1.0.3

Partition table scan:
  MBR: protective
  BSD: not present
  APM: not present
  GPT: present

Found valid GPT with protective MBR; using GPT.
Disk /dev/vda: 838860800 sectors, 400.0 GiB
Sector size (logical/physical): 512/512 bytes
Disk identifier (GUID): 692C390D-E7F6-4C94-92E4-064921194812
Partition table holds up to 128 entries
Main partition table begins at sector 2 and ends at sector 33
First usable sector is 34, last usable sector is 419430366
Partitions will be aligned on 2048-sector boundaries
Total free space is 2014 sectors (1007.0 KiB)

Number  Start (sector)    End (sector)  Size       Code  Name
   1            2048            4095   1024.0 KiB  EF02  BIOS boot partition
   2            4096         1028095   500.0 MiB   8300  Linux filesystem
   3         1028096         9416703   4.0 GiB     8200  Linux swap
   4         9416704       419430366   195.5 GiB   8300
gdisk コマンドの結果から「/dev/vda」のサイズは 400GB に拡張されていることは確認できますが、OS 側からの認識状況では4つのパーティションとして認識している容量の合計は 200GB です。
# lsblk
NAME   MAJ:MIN RM   SIZE RO TYPE MOUNTPOINT
sr0     11:0    1  1024M  0 rom
vda    253:0    0   400G  0 disk
├─vda1 253:1    0     1M  0 part
├─vda2 253:2    0   500M  0 part /boot
├─vda3 253:3    0     4G  0 part [SWAP]
└─vda4 253:4    0 195.5G  0 part /
また、lsblk コマンドの結果から、標準OSでインストールした際に作成された4つのパーティション「vda1」「vda2」「vda3」「vda4」が確認できます。
ディスクの拡張
パーティションをソートする
# sgdisk -s /dev/vda
Warning: The kernel is still using the old partition table.
The new table will be used at the next reboot or after you
run partprobe(8) or kpartx(8)
The operation has completed successfully.
再度 gdisk コマンドでディスクの状況を確認します。
# gdisk -l /dev/vda
GPT fdisk (gdisk) version 1.0.3

Partition table scan:
  MBR: protective
  BSD: not present
  APM: not present
  GPT: present

Found valid GPT with protective MBR; using GPT.
Disk /dev/vda: 838860800 sectors, 400.0 GiB
Sector size (logical/physical): 512/512 bytes
Disk identifier (GUID): 692C390D-E7F6-4C94-92E4-064921194812
Partition table holds up to 128 entries
Main partition table begins at sector 2 and ends at sector 33
First usable sector is 34, last usable sector is 838860766
Partitions will be aligned on 2048-sector boundaries
Total free space is 419432414 sectors (200.0 GiB)

Number  Start (sector)    End (sector)  Size       Code  Name
   1            2048            4095   1024.0 KiB  EF02  BIOS boot partition
   2            4096         1028095   500.0 MiB   8300  Linux filesystem
   3         1028096         9416703   4.0 GiB     8200  Linux swap
   4         9416704       419430366   195.5 GiB   8300
「Total free space is 419432414 sectors (200.0 GiB)」と表示されていることから、空き容量を正常に認識しました。
新しいパーティションを作成する
gdisk コマンドで新しいディスクパーティションを作成します。
# gdisk /dev/vda
GPT fdisk (gdisk) version 1.0.3

Partition table scan:
  MBR: protective
  BSD: not present
  APM: not present
  GPT: present

Found valid GPT with protective MBR; using GPT.

*[ n ] コマンドを入力します。新しいパーティションを作るという意味です。*
Command (? for help): n

*Partition number はデフォルトの [ 5 ] にしますので、そのまま [ Enter ] キーを押します。*
Partition number (5-128, default 5):

*Fisrt sector/Last sector もデフォルトの数値にするので、そのまま [ Enter ] キーを押します。*
First sector (34-838860766, default = 419430400) or {+-}size{KMGTP}:
Last sector (419430400-838860766, default = 838860766) or {+-}size{KMGTP}:

*Partition Type もデフォルトの [ Linux filesystem ] で問題がなければ、そのまま [ Enter ] キーを押します。*
Current type is 'Linux filesystem'
Hex code or GUID (L to show codes, Enter = 8300):
Changed type of partition to 'Linux filesystem'

*作成完了したので、 [ p ] コマンドでパーティションテーブルの確認をします。*
Command (? for help): p
Disk /dev/vda: 838860800 sectors, 400.0 GiB
Sector size (logical/physical): 512/512 bytes
Disk identifier (GUID): 692C390D-E7F6-4C94-92E4-064921194812
Partition table holds up to 128 entries
Main partition table begins at sector 2 and ends at sector 33
First usable sector is 34, last usable sector is 838860766
Partitions will be aligned on 2048-sector boundaries
Total free space is 2047 sectors (1023.5 KiB)

*表示されている新しいパーティションテーブルにサイズなどの問題がないことを確認します。*
Number  Start (sector)    End (sector)  Size       Code  Name
   1            2048            4095   1024.0 KiB  EF02  BIOS boot partition
   2            4096         1028095   500.0 MiB   8300  Linux filesystem
   3         1028096         9416703   4.0 GiB     8200  Linux swap
   4         9416704       419430366   195.5 GiB   8300
   5       419430400       838860766   200.0 GiB   8300  Linux filesystem

*問題がなければ [ w ] コマンドを入力します。*
Command (? for help): w

Final checks complete. About to write GPT data. THIS WILL OVERWRITE EXISTING
PARTITIONS!!

*もう一度確認をして問題がなければ [ Y ]を入力して、 [ Enter ] キーを押します。*
*このコマンドを実行すると、ディスクの書き換えが発生するので、必ず確認した上で実行しましょう。*
Do you want to proceed? (Y/N): Y
OK; writing new GUID partition table (GPT) to /dev/vda.
Warning: The kernel is still using the old partition table.
The new table will be used at the next reboot or after you
run partprobe(8) or kpartx(8)
The operation has completed successfully.
ファイルシステムを作る
# ls /dev/vda5

ls: cannot access /dev/vda5: No such file or directory
新しく作成した vda5 がデバイスとして認識されていない場合は、一度OSを再起動します。
# reboot
ヒント
再起動が困難な場合は、以下のコマンドで強制的に認識させることも可能です。
# partx -a /dev/vda
vda5 がOSに認識されたら、 mkfs.ext4 コマンドでフォーマットを実行します。
# mkfs.ext4 /dev/vda5

mke2fs 1.44.3 (10-July-2018)
Creating filesystem with 52428795 4k blocks and 13107200 inodes
Filesystem UUID: f023b125-a8ed-445b-b3ca-14ae5b953b22
Superblock backups stored on blocks:
        32768, 98304, 163840, 229376, 294912, 819200, 884736, 1605632, 2654208,
        4096000, 7962624, 11239424, 20480000, 23887872

Allocating group tables: done
Writing inode tables: done
Creating journal (262144 blocks): done
Writing superblocks and filesystem accounting information: done
新しいディスクをマウントする
初期化した領域をディスクとして使うため、マウントポイントを作成します。
# mkdir /data
マウントポイントの作成後、 /dev/vda5 を /data にマウントします。
# mount /dev/vda5 /data
正常にマウントがおこなえたか確認します。
# mount | grep vda5
/dev/vda5 on /data type ext4 (rw,relatime)
# lsblk
NAME   MAJ:MIN RM   SIZE RO TYPE MOUNTPOINT
sr0     11:0    1  1024M  0 rom
vda    253:0    0   400G  0 disk
├─vda1 253:1    0     1M  0 part
├─vda2 253:2    0   500M  0 part /boot
├─vda3 253:3    0     4G  0 part [SWAP]
├─vda4 253:4    0 195.5G  0 part /
└─vda5 253:5    0   200G  0 part /data
# id=$(blkid -o value -s UUID /dev/vda5)
# echo "UUID=${id} /data ext4 defaults 0 2" >> /etc/fstab