FortiGateVM 初期設定概要
[更新: 2026年04月09日]
1. 初期設定概要
本ページでは、弊社マーケットプレイス上で提供する FortiGateVMに関する初期設定についてご案内します。
1.1 前提条件
本ページは、以下の前提条件に基づき作成されています。
本ページに記載している初期設定手順は FortiOS Ver7.4.6 を前提としています。ご利用のバージョンによっては、初期設定の手順や画面構成が一部異なる場合があります。
FortiGateVM のご利用には、 FortiGateVMライセンス をインポートする必要があります。
仮想サーバーの作成手順は、本ページでは省略しています。
本ページでは、最低限の初期設定方法のみをご案内しています。参考情報としてご利用ください。
2. 構成例
本ページで紹介する構成は、以下の最小構成を基にしています。
最小構成図

リソース環境
プラン項目 |
利用プラン |
|---|---|
サーバープラン |
1コア/4GB |
ディスクプラン |
SSDプラン 20GB |
OS |
FortiGateVM Ver7.4.6 |
NIC |
インターネットに接続 |
3. 初期設定手順
初期設定の概要です。
注釈
初期設定手順は、最低限の内容に限っています。ライセンスのインポートおよびネットワークの初期設定のみを記載しています。
注釈
その他の設定手順については、TIPS やメーカードキュメントとして公開されている場合があります。そちらをご参照ください。
3.1 初期起動
さくらのクラウドコントロールパネルにログインし、対象のサーバーのコンソール画面に進みます。
FortiGateVM への初回ログイン時は、以下を入力してください。
user: admin
password: <ブランク>
ログイン後、新しいパスワードの設定が求められますので、任意のパスワードを設定します。
コンソール画面
注釈
FortiGateVM には、Linux OS のレスキューモードに相当するログイン方法はありません。パスワードを忘れないようご注意ください。
3.2 アクセス許可確認
FortiOS のインターフェースに対するアクセス許可のデフォルト設定は、利用する FortiOS のバージョンによって異なります。
さくらのクラウドのコンソール画面から FortiOS にログインし、allowaccess の設定を確認して、必要なプロトコルを有効にします。
 FGVM1VTM2201xxxx (interface) # show
 config system interface
   edit "port1"
       set vdom "root"
       set mode dhcp
       set allowaccess ping https ssh http
       set type physical
       set snmp-index 1
   next
   edit "naf.root"
       set vdom "root"
       set type tunnel
       set src-check disable
       set snmp-index 2
   next
   edit "l2t.root"
       set vdom "root"
       set type tunnel
       set snmp-index 3
   next
   edit "ssl.root"
       set vdom "root"
       set type tunnel
       set alias "SSL VPN interface"
       set snmp-index 4
   next
   edit "fortilink"
       set vdom "root"
       set fortilink enable
       set ip 10.255.1.1 255.255.255.0
       set allowaccess ping fabric
       set type aggregate
       set lldp-reception enable
       set lldp-transmission enable
       set snmp-index 5
   next
 end
3.2.1 アクセス許可設定例
例として、NIC0に該当するport1に対して、SSHとHTTPSのみを許可する設定コマンドを示します。
FortiGate-VM64-KVM # config system interface
FortiGate-VM64-KVM(interface) # edit port1
FortiGate-VM64-KVM(port1) # set allowaccess ssh https
FortiGate-VM64-KVM(port1) # end
3.3 ライセンスファイルのインポート
FortiGateVM のご利用にはライセンスファイルが必要です。
NIC0に該当するport1でHTTPまたはHTTPSが許可されている場合、Webブラウザから FortiGateVM のGUIにアクセスできます。
以降はGUIでのライセンスファイルのインポート方法です。
3.3.1 GUIへのアクセス
Webブラウザのアドレスバーに http://<NIC0 の IPアドレス> を入力し、GUIに接続します。
GUIログイン画面
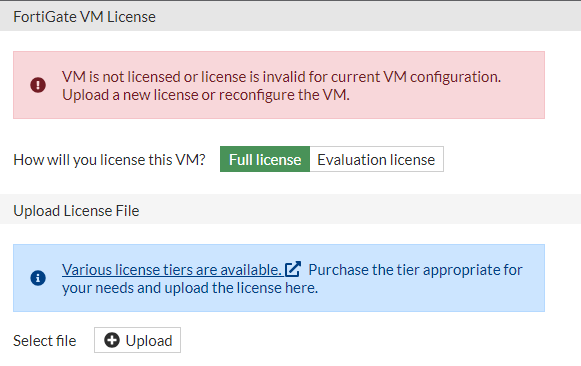
3.3.2 ライセンスファイルのインポート
GUIに初めてアクセスするとライセンスファイルのインポートが要求されますので、お手元のライセンスファイルをアップロードし、 OK をクリックしてください。
正しくライセンスファイルがインポートされると、FortiGateVMが再起動します。
ライセンスインポート画面
注釈
FortiGateVM のライセンスは、1つの FortiGateVM につき 1つのライセンスファイルが必要です。同一のライセンスファイルを複数のサーバー(FortiGateVM)で使用すると、ライセンス認証の不具合が生じます。
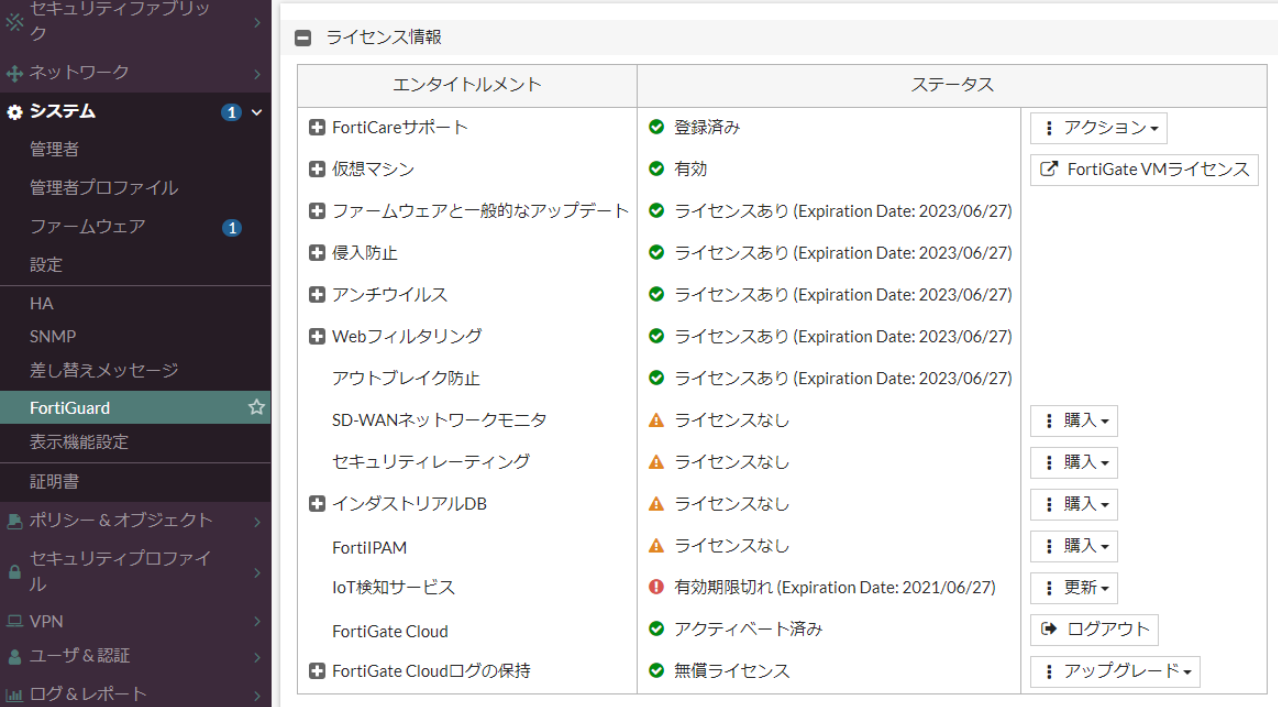
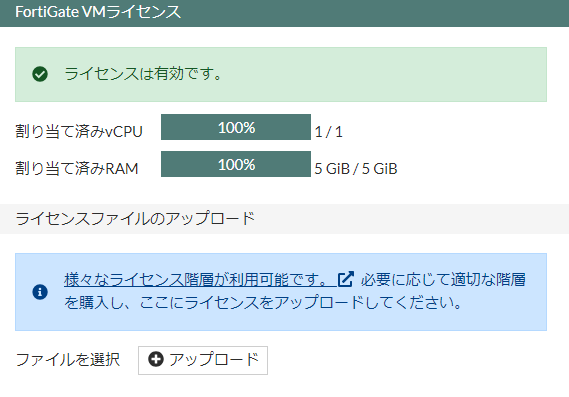
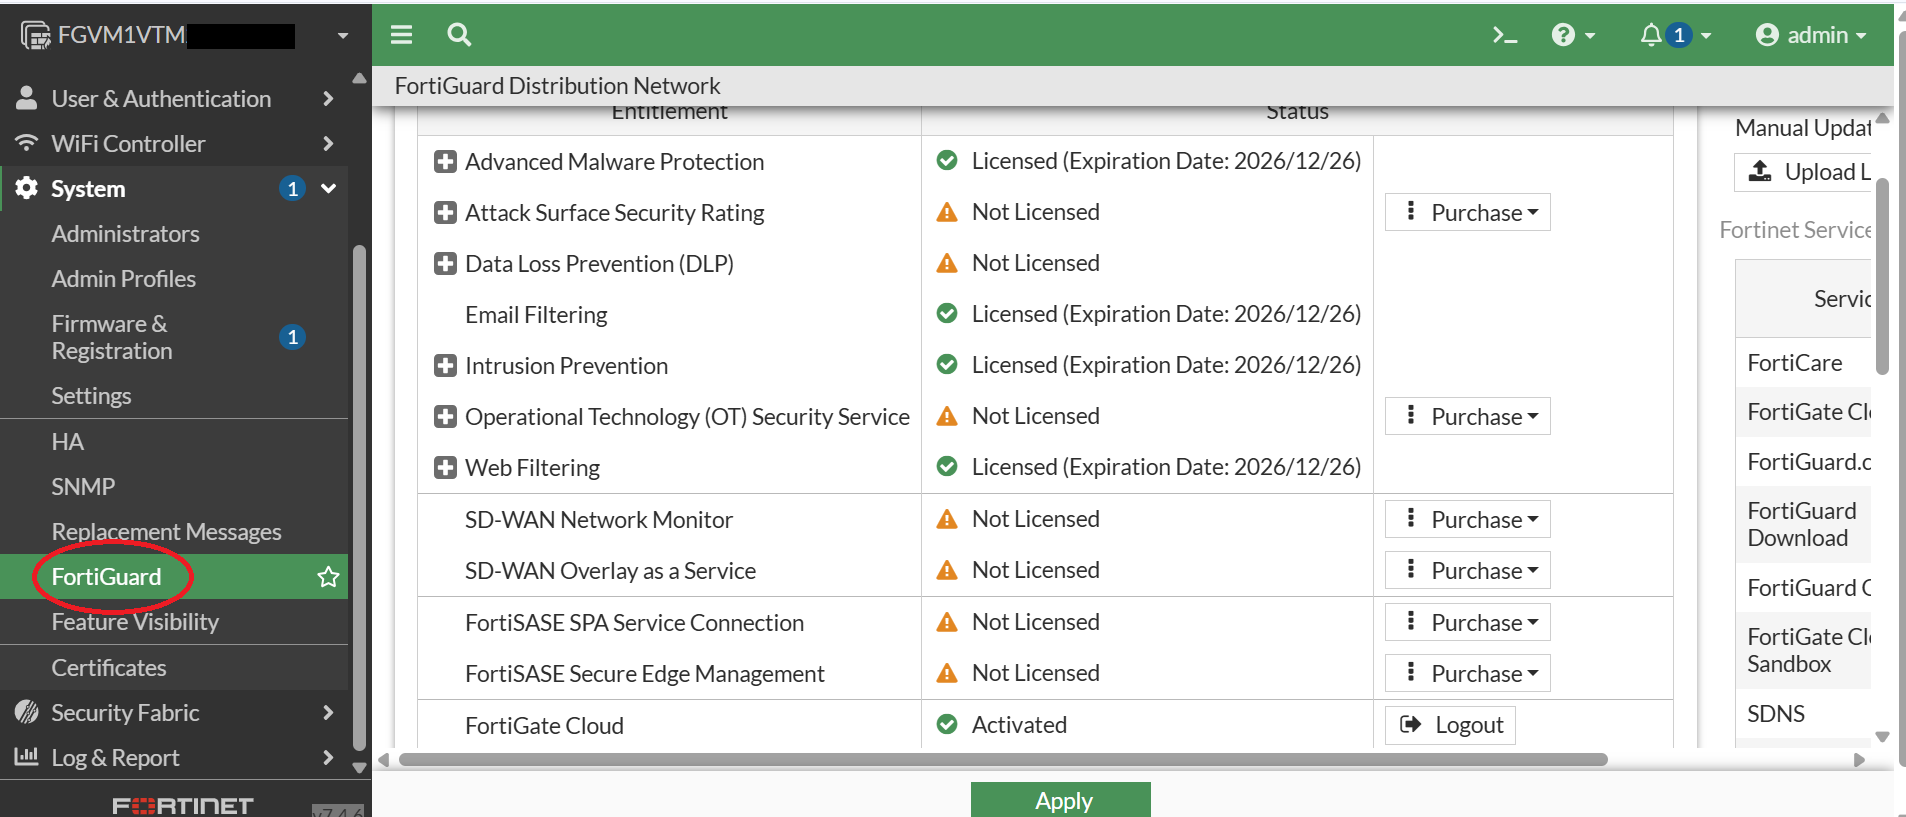
3.3.3 ライセンスファイルのインポートの確認
再起動後、ログイン画面からログインし、サイドバーの System > FortiGuard と進み、ライセンスプランに応じた機能が有効になっているか確認してください。
ライセンス確認画面
注釈
有効期限が表示されていますが、お客様による更新作業は不要です。
注釈
有効期限の1週間前になっても更新されておらず、念のために有効期限を確認したい場合は、サポート窓口までお問い合わせください。