Arcserve 関連製品 初期設定例(Linux環境)
[更新: 2025年3月7日]
弊社による検証データの一部を公開した記事掲載となります。参考までにご利用ください。
1. 概要
本掲載は、Arcserve UDPの初期設定に関する参考情報です。参考までにご活用ください。
注釈
お客様個別の要件定義、設計、開発・設定補助に関するサポートは、Arcserve 関連製品のライセンスサービスに含まれません。ご注意ください。
1.1 検証条件
検証は
Arcserve Unified Data Protection バージョン: 10.0.6455となります。検証環境のOSは、Almalinux 9.4を利用しました。
仮想サーバー作成、Almalinux 9.4に関する設定は、省略いたします。
本インストールは、CLIにより実行します。GUIの動作に必要となるコンポーネント、ソフトウェアのインストールが必要です。
インストールには管理者権限が必要です。参考コマンドはrootアクセスを許可により実行した参考例となります。
注釈
LinuxOSのグループポリシー、セキュリティ設定は、OS管理者のお客様により設定が必要です。
2. ソフトウェアのインストール
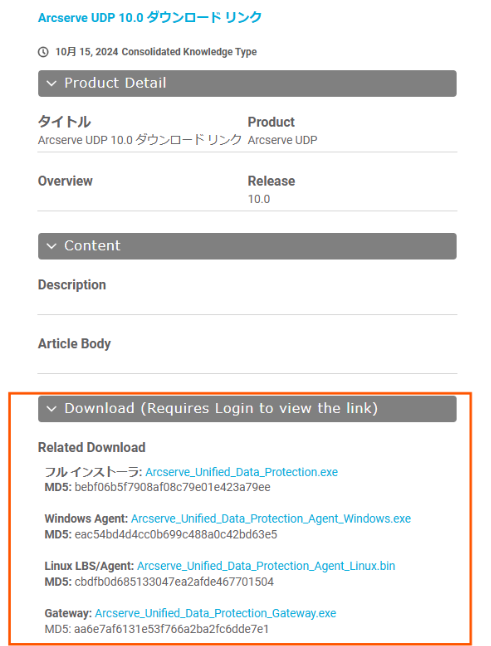
Arcserveサポート ポータル アカウント開設後、ソフトウェアのダウンロードが可能です。
ログイン後、Arcserve UDPのソフトウェアをダウンロードします。
注釈
インストール実行前に必要環境要件を確認、ファイアウォール、ユーザ権限、IPアドレス、ホスト設定などの設定を予め実施しましょう。
2.1 ソフトウェア ダウンロード
Arcserve Support CommunityのArcserve UDPダウンロードページより必要となるソフトウェアをダウンロードします。
Arcserve UDP 10.0 ダウンロード リンク | Arcserve Support Community
参考コマンド(/tmpへディレクトリに配置)
wgetなどによりインストールするデバイスにソフトウェアをダウンロードします。ダウンロード後、ファイルの権限を変更します(chmod 755 etc...)。
# wget https://*****/Arcserve_Unified_Data_Protection_Agent_Linux.bin
--2025-02-18 19:57:43--  https://*****/Arcserve_Unified_Data_Protection_Agent_Linux.bin
Resolving downloads.arcserve.com (downloads.arcserve.com)... 3.164.121.78, 3.164.121.96, 3.164.121.74, ...
Connecting to downloads.arcserve.com (downloads.arcserve.com)|3.164.121.78|:443... connected.
HTTP request sent, awaiting response... 200 OK
Length: 1287204130 (1.2G) [application/octet-stream]
Saving to: ‘Arcserve_Unified_Data_Protection_Agent_Linux.bin’

Arcserve_Unified_Data_Protect 100%[==============================================>]   1.20G  21.1MB/s    in 62s

2025-02-18 19:58:45 (20.0 MB/s) - ‘Arcserve_Unified_Data_Protection_Agent_Linux.bin’ saved [1287204130/1287204130]
注釈
linux環境は、RPSサーバー/コンソールサーバーはインストールできません。Agentをダウンロード使用します。
重要
***** によりダウンロードリンクはマスクします。正式なURLはダウンロードページをご確認ください。
2.1.1 コンポーネントのダウンロード
LinuxOS環境の利用は、Arcserve UDPのインストール前に各ソフトウェアとコンポーネントをダウンロードとインストールします。
参考コマンド
# dnf list installed | grep perl
# dnf -y install perl
# dnf -y install ssh
# dnf -y install openssh
# dnf -y install genisoimage
# dnf -y install cifs-utils
# dnf -y install nfs-utils
# dnf -y install curl
# dnf -y install wget
# dnf -y install mdadm
# dnf -y install kpartx
# dnf -y install lvm2
# dnf -y install net-tools
注釈
NFSなどをコンソール/RPSサーバーに用意する際は、NFSクライアントなどのツールも合わせてインストールしましょう。
重要
必要コンポーネントが不足する際は、インストールが画面に警告とインストールの中断に関するメッセージが表示されます。
2.2 Arcserve UDP インストール
入手したインストーラーをデバイス上で実行します。
参考コマンド
#  ./Arcserve_Unified_Data_Protection_Agent_Linux.bin]Extracting ...  [Completed]
Checking platform ...
Checking dependencies ...
Missed Applications:     Affected Function:
-------------------------------------------
netstat                  Unable to check if the needed network port is already occupied or not.
重要
netstat: command not foundの表示が発生する際は、コマンドの利用環境が不足している可能性があります。インストールを実行してください(必要に応じて再起動を実行もします)。
2.2.1 インストールの実行指定
メッセージに従い条件を指定します。
Do you want to continue the installation process? [y|n] (default: n) y
Extracting files from package ...  [Completed]
Installing Arcserve UDP Agent(Linux) to /opt/Arcserve/d2dserver ...  [Completed]
Installing the restore-utility package ...  [Completed]
Creating Live CD ...  [Completed]
The Live CD for Arcserve UDP Agent(Linux) was built at: /opt/Arcserve/d2dserver/packages
The Arcserve UDP Agent(Linux) was successfully installed.

-------------------------------------------------------------------------------
Verify that the following ports are enabled for your firewall:
TCP port: 22(SSH Server), 8014(Agent Web Service), 8016(Agent Data Service); 8021(Agent Communication Service); UDP port: 69(TFTP Server); Broadcast port: 67(BOOTP Server).

Use the following URL address to access and manage the Arcserve UDP Agent(Linux) server: https://arcserve-server:8014
-------------------------------------------------------------------------------

Installer can now register this UDP Linux Backup Server to Arcserve UDP. You could safely skip this step, and then register this node from web interface of Arcserve UDP by clicking "Add Nodes"->"Adding Linux Backup Server Node". Do you want to register to Arcserve UDP now? [y|n] (default: n) n
You can register this UDP Linux Backup Server to Arcserve UDP any time by clicking "Add Nodes"->"Adding Linux Backup Server Node".

Starting server ...  [Completed]
注釈
EULAは、spaceキーで画面下部迄スキップが可能ですが、必ず確認しましょう。
3. インストールの確認
インストール完了後、コンソールにアクセスが可能です。
設定したホスト名、IPアドレス、localhostをアドレスに入力、Agentに接続します。
https://localhost:8015
https://ホスト名:8015
https://IPアドレス:8015
コンソール画面