攻撃遮断くん サーバセキュリティタイプの初期設定
[更新: 2025年10月8日]
本記事は、弊社で検証したデータの一部を公開しています。ご参考としてご活用ください。
1. はじめに
本記事は、サーバセキュリティタイプの初期設定を解説します。実際の検証データをもとに、設定例や操作手順をまとめています。
注釈
個別の要件定義や設計、開発・設定のサポートは、攻撃遮断くんのサービスには含まれませんのでご注意ください。
1.2 概要
本TIPSは、サーバセキュリティタイプの方法を解説するページです。詳細は下記をご確認ください。
2. 前提条件(環境・制約)
2.1 攻撃遮断くん 対象サービス / バージョン
項目 |
内容 |
|---|---|
対象サービス |
サーバセキュリティタイプ ベーシック |
対象プロトコル |
http |
検証環境 |
攻撃遮断くん 検証環境の作成(Webサーバーの準備)のページ参照 |
最終検証日 |
2025/09/26 |
注釈
本TIPSの検証条件は上表の通りです。環境差により結果が異なる場合があります。
重要
CDNの利用がないため、本手順は、Aレコード(IPアドレス)を前提に掲載します。
2.2 検証環境(OS・ミドルウェア・クラウド構成)
攻撃遮断くん 検証環境の作成(Webサーバーの準備)のページ参照
2.3 注意事項(免責、サポート範囲外など)
本ページに掲載する情報のご利用による損害が直接的又は間接的かを問わず、一切の責任を負いません。
セキュリティは、原則は攻撃者側が有利なポジションです。未知の攻撃などすべての攻撃に対して必ずしも有効にならないケースがあります。
外部からの脅威に対し、攻撃遮断くんを事前の対策として活用いただき、事後の対策についてもご検討ください。
3. 手順
3.1 攻撃遮断くん ホスト型WAFの導入
ホスト型WAFは、サーバー環境にAgentを導入しWAF機能を利用するサービスです。
ホスト型のため帯域の考慮は不要、サーバーに導入することでご利用が可能です。
3.1.1 シナリオ概要
本検証では、利用開始後に防御証明メールを利用する場合の設定例を掲載します。
1. さくらのクラウド上のWebサーバーに対し、ホスト型のWAFを導入、ステータスをオンラインに変更したい。
1. サーバーセキュリティタイプをインストール、セットアップを実施、configの初期設定を実施します。
3.1.2 管理画面のログイン
サーバセキュリティタイプの管理画面にログインします。
ダッシュボード |攻撃遮断くん 管理画面
3.1.3 Agentのインストール
サーバセキュリティタイプのエージェントをダウンロード、インストールとセットアップを実行します。
ダッシュボード |攻撃遮断くん 管理画面
http://<FQDM>/cybersecuritycloud/waftest

 <エージェント名>-<バージョン>.rpm                          100%[========================================================================================================================================>] 550.44K  --.-KB/s    in 0.008s

 2025-10-06 10:21:05 (63.9 MB/s) - ‘<エージェント名>-<バージョン>.rpm’ saved [563648/563648]
 [root@mkt-sk-test ~]# rpm -ivh <エージェント名>-<バージョン>.rpm
 Verifying...                          ################################# [100%]
 Preparing...                          ################################# [100%]
 Updating / installing...
 1:<エージェント名>-<バージョン>          ################################# [100%]
3.1.4 パッケージのインストール
サーバセキュリティタイプの動作に必要なパッケージをインストールします。
 [root@mkt-sk-test ~]# yum install expect

 =============================================================================================================================================================================================================================================
 Package                                               Architecture                                          Version                                                          Repository                                                Size
 =============================================================================================================================================================================================================================================
 Installing:
 expect                                                x86_64                                                5.45.4-16.el9                                                    appstream                                                245 k
 Installing dependencies:
 tcl                                                   x86_64                                                1:8.6.10-7.el9                                                   baseos                                                   1.1 M

 [root@mkt-sk-test ~]# yum install nftables

 Nothing to do.
 Complete!
3.1.5 サーバセキュリティタイプのセットアップ
サーバセキュリティタイプ Agentのセットアップを開始します。
エージェントキーは、エージェント詳細情報より確認が可能です。
 [root@mkt-sk-test ~]# /var/shadan-kun/bin/manage_agents

 ****************************************
 * <エージェント名> <バージョン> Agent manager.     *
 * The following options are available: *
 ****************************************
 (I)mport key from the server (I).
 (Q)uit.

 <「i」を入力して[Enter]>

 * Provide the Key generated by the server.
 * The best approach is to cut and paste it.
 *** OBS: Do not include spaces or new lines.
 Paste it here (or '\q' to quit): <エージェントキー>
 Agent information:
 ID:xxx
 Name:hostxxxxxx
 IP Address:any
 Confirm adding it?(y/n): y
 ** Press ENTER to return to the main menu.
 ****************************************
 * <エージェント名> <バージョン> Agent manager. *
 * The following options are available: *
 ****************************************
 (I)mport key from the server (I).
 (Q)uit.
 Choose your action: I or Q: q
 ** You must restart <エージェント名> for your changes to take effect.

 manage_agents: Exiting.
エージェント 詳細情報 |攻撃遮断くん 管理画面
3.1.6 サーバセキュリティタイプのconfig修正
エージェントのconfigを修正します。
httpdとエージェント 詳細情報に記載される接続情報を設定します。
 [root@mkt-sk-test ~]# cat /var/shadan-kun/etc/<エージェント名>.conf
 <<エージェント名>_config>
 <client>
     <server-hostname><攻撃遮断くん管理画面 ホスト名></server-hostname>
     <port><port番号></port>
 </client>

 <rootcheck>
     <disabled>yes</disabled>
 </rootcheck>
 <!-- Files to monitor (localfiles) -->

 <localfile>
     <log_format>syslog</log_format>
     <location>/var/log/messages</location>
 </localfile>

 <localfile>
     <log_format>syslog</log_format>
     <location>/var/log/secure</location>
 </localfile>

 <localfile>
     <log_format>syslog</log_format>
     <location>/var/log/maillog</location>
 </localfile>

 <localfile>
     <log_format>command</log_format>
     <command>df -P</command>
 </localfile>

 <localfile>
     <log_format>full_command</log_format>
     <command>netstat -tan |grep LISTEN |egrep -v '(127.0.0.1| ::1)' | sort</command>
 </localfile>

 <localfile>
     <log_format>full_command</log_format>
     <command>last -n 5</command>
 </localfile>

 <localfile>
 <log_format>apache</log_format>
 <location>/var/log/httpd/error_log</location>
 </localfile>

 <localfile>
 <log_format>apache</log_format>
 <location>/var/log/httpd/access_log</location>
 </localfile>

 </<エージェント名>_config>
3.1.6 サーバセキュリティタイプのhost情報修正
 [root@mkt-sk-test ~]# cat /etc/hosts
 127.0.0.1   localhost localhost.localdomain localhost4 localhost4.localdomain4
 ::1         localhost localhost.localdomain localhost6 localhost6.localdomain6
 <IPアドレス> <FQDN>
4. 検証(確認方法)
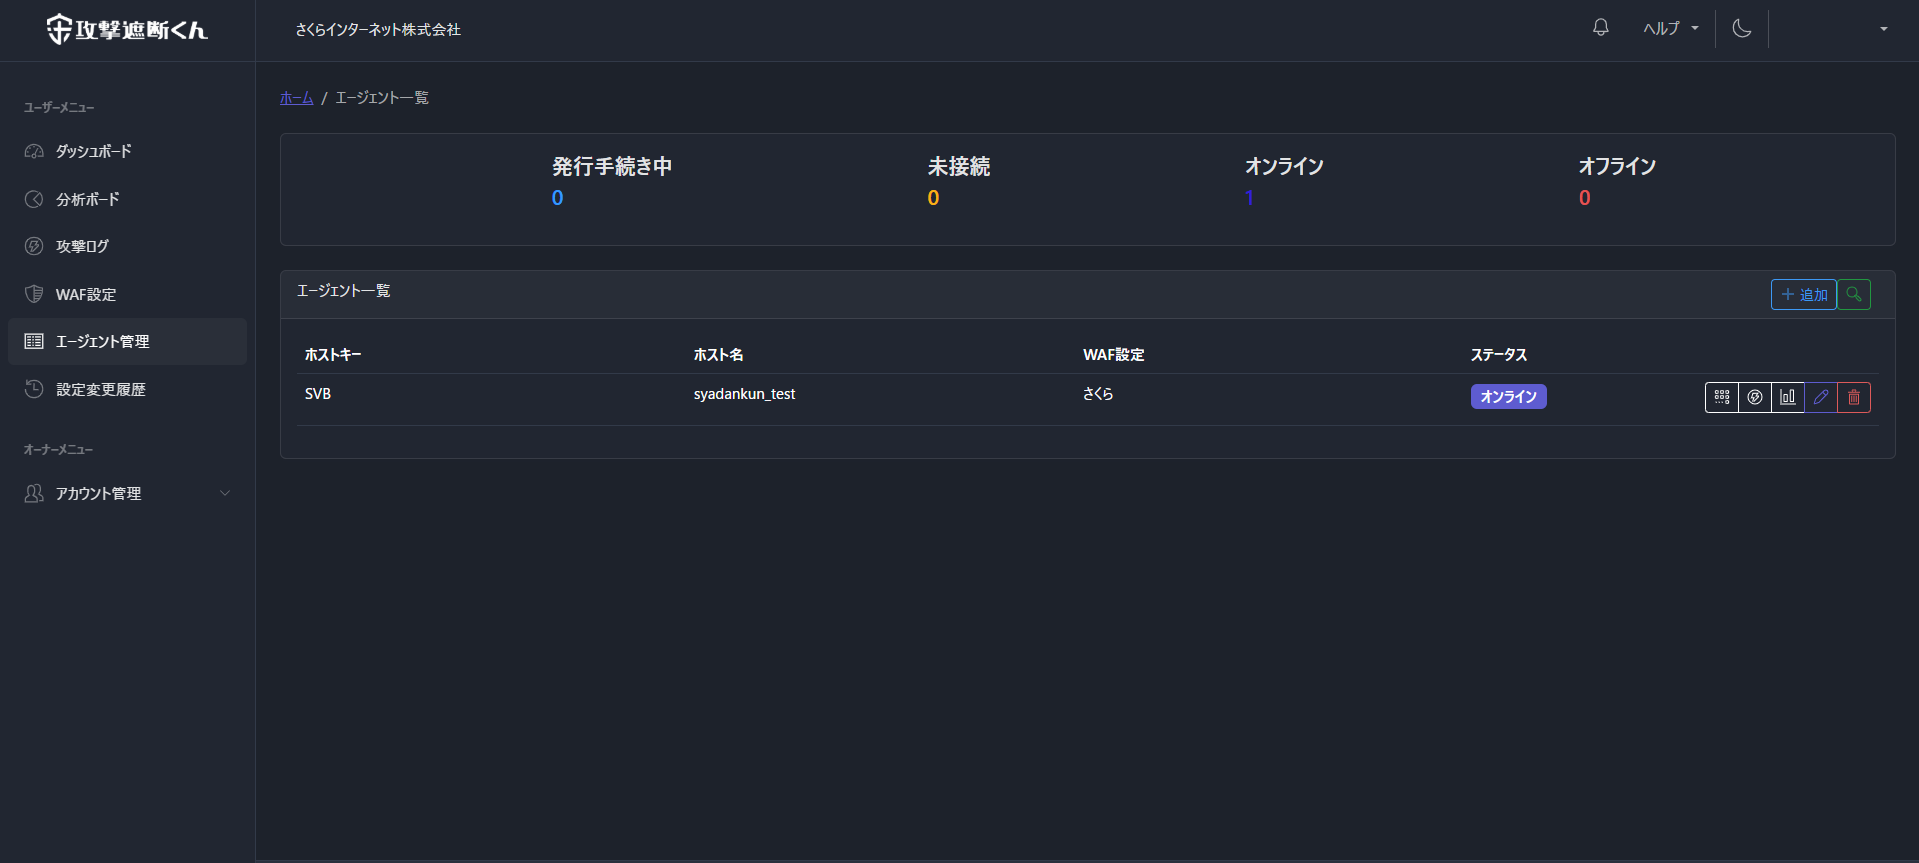
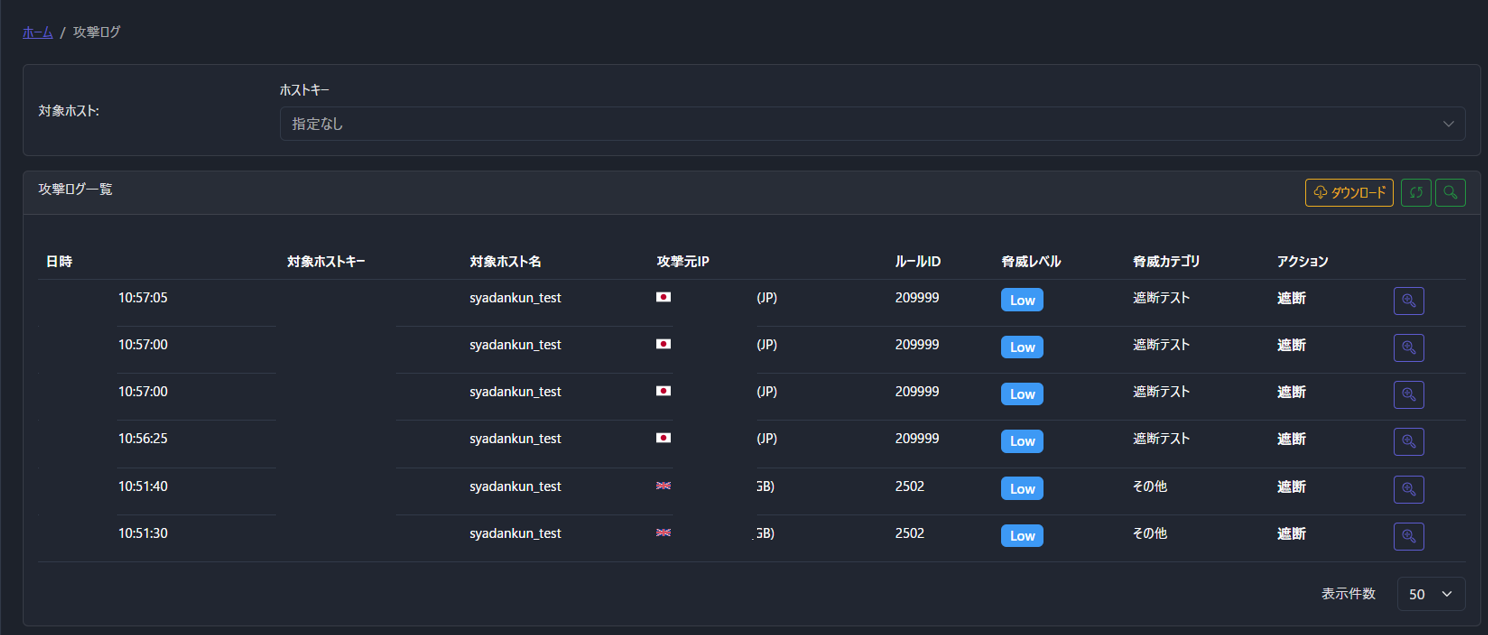
エージェント管理画面より、ステータス(オンライン)を確認、テスト用URLを利用、ブラウザからアクセスを実施します。
エージェント管理画面 | 攻撃遮断くん管理画面
攻撃ログ | 攻撃遮断くん管理画面
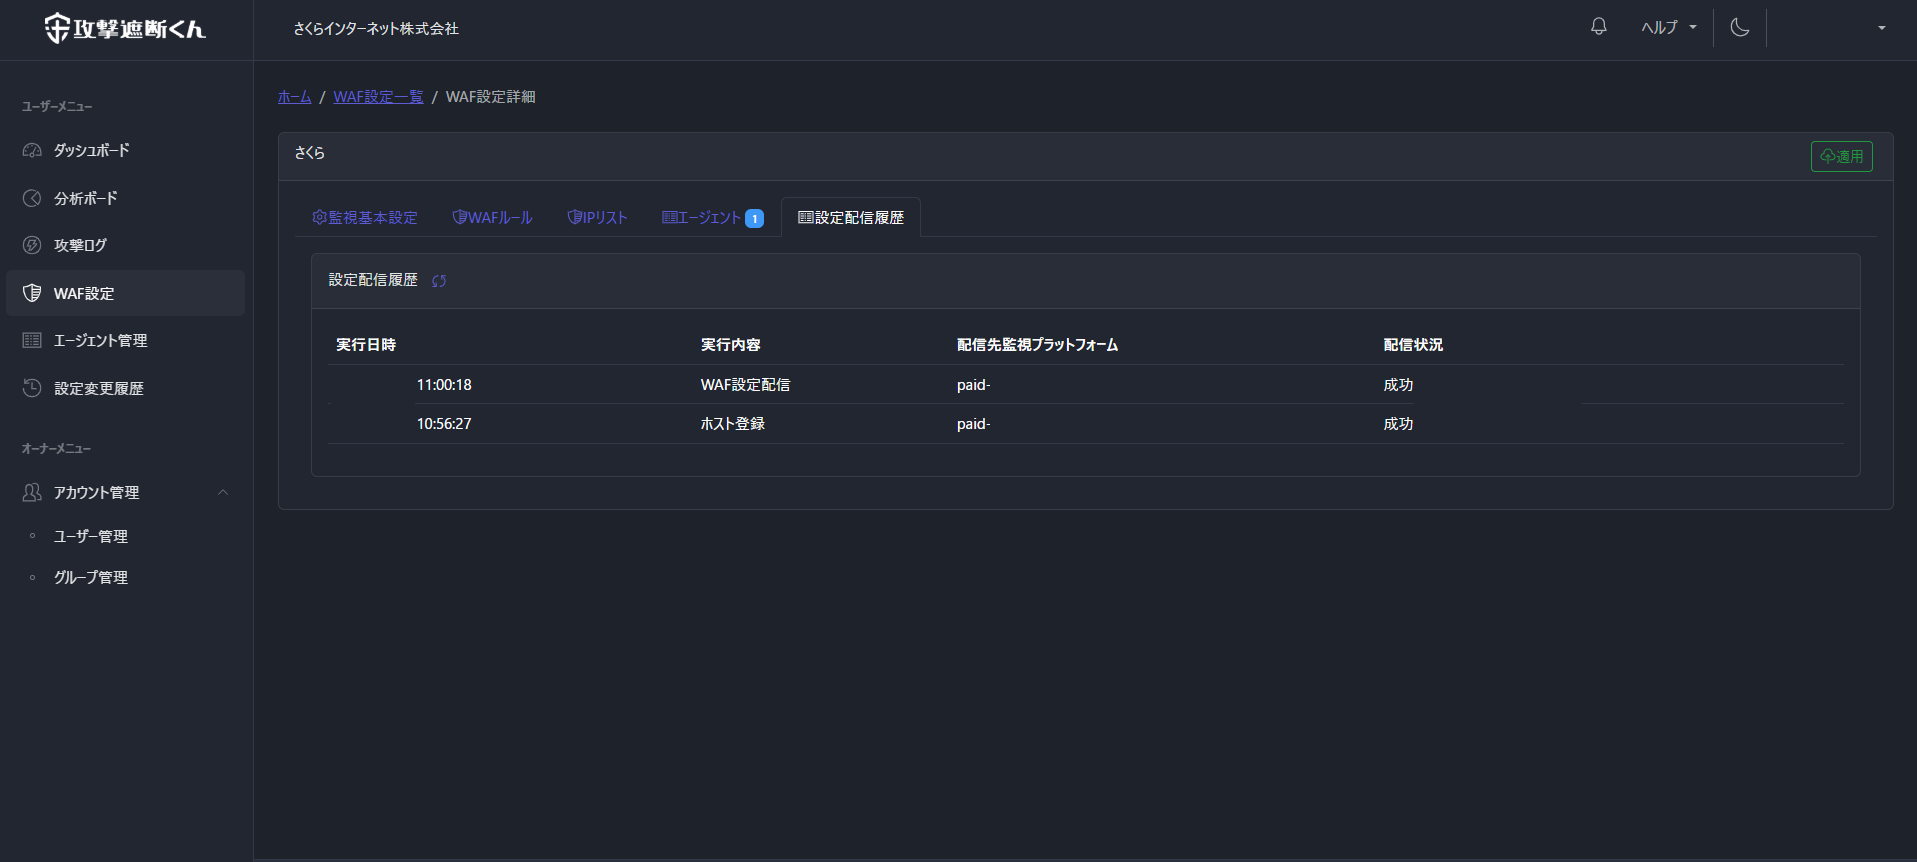
設定配信履歴 | WAF設定詳細 | 攻撃遮断くん管理画面